> ## Documentation Index
> Fetch the complete documentation index at: https://base-a060aa97-eb-mini-app-ia-overhaul.mintlify.site/llms.txt
> Use this file to discover all available pages before exploring further.
# MiniKit Quickstart
> Learn how to build mini apps on Base with MiniKit - from setup to deployment and advanced features
This guide shows you how to get started with MiniKit, the easiest way to build mini apps on Base! It can also be used to update an existing standalone app to a mini app. We'll start by setting up the template project with the CLI tool and then explore both built-in and additional features of MiniKit.
## Prerequisites
Before you begin developing with MiniKit, you'll need:
1. **Farcaster Account**: Create an account on [Farcaster](https://farcaster.xyz/) to test and deploy your Mini Apps.
2. **Coinbase Developer Platform Account** (Optional): Sign up for a [Coinbase Developer Platform](https://www.coinbase.com/developer-platform) account if you need CDP API key for additional functionalities.
## What is a Mini App?
A mini app is a lightweight web app that runs directly inside [Farcaster](https://docs.farcaster.xyz/developers/frames/v2/), without needing to open a browser or download anything. Built using familiar tools like Next.js and minikit, mini apps behave just like normal apps — but launch instantly from posts, making them feel native to the Farcaster experience.
## Initial Setup
```bash
npx create-onchain --mini
```
You can get a CDP API key by going to the [CDP
Portal](https://www.coinbase.com/developer-platform) and navigating API Keys →
Client API Key.
You will be asked if you'd like to set up your manifest. You can skip the
manifest setup step as we'll handle that separately once we know our project's
URL.
```bash Terminal
cd your-project-name
npm install
npm run dev
```
These docs are LLM-friendly—reference [llms.txt](https://docs.base.org/base-app/build-with-minikit/llms.txt) in your code editor to streamline builds and prompt smarter.
## Testing Your Mini App
To test your Mini App in Farcaster, you'll need a live URL.
We recommend using [Vercel](https://vercel.com) to deploy your MiniKit app, as it integrates seamlessly with the upstash/redis backend required for stateful Mini Apps, webhooks, and notifications.
Alternatively, you can use ngrok to tunnel your localhost to a live url.
To successfully test your app, you'll need the paid version of ngrok. The free
version has an approval screen which can break the frame manifest. Also the
url for the free version will change every time requiring you to update the
manifest each time you start a new ngrok tunnel.
1. Start your development server:
```bash Terminal
npm run dev
```
2. Install and start ngrok to create a tunnel to your local server:
```bash Terminal
# Install ngrok if you haven't already
npm install -g ngrok
# Create a tunnel to your local server (assuming it's running on port 3000)
ngrok http 3000
```
3. Copy the HTTPS URL provided by ngrok (e.g. `https://your-tunnel.ngrok.io`)
4. Visit the [Farcaster Manifest Tool](https://farcaster.xyz/~/developers/mini-apps/manifest)
5. Paste your ngrok URL into "Domain" and tap Submit
### Deploying to Vercel
```bash
npm install -g vercel
```
`bash vercel `
You can use `vercel env add` to set these up via CLI:
* NEXT\_PUBLIC\_CDP\_CLIENT\_API\_KEY (from [CDP Portal](https://www.coinbase.com/developer-platform))
* NEXT\_PUBLIC\_URL (deployed app URL)
* NEXT\_PUBLIC\_IMAGE\_URL (optional)
* NEXT\_PUBLIC\_SPLASH\_IMAGE\_URL (optional)
* NEXT\_PUBLIC\_SPLASH\_BACKGROUND\_COLORs
You can now test your mini app:
1. Copy your deployed vercel URL
2. Visit the [Farcaster Manifest Tool](https://farcaster.xyz/~/developers/mini-apps/manifest)
3. Paste URL into "Domain"
4. Tap Submit
## Exploring Built-in Features
The template comes with several pre-implemented features. Let's explore where they are and how they work.
### MiniKitProvider
The `MiniKitProvider` is set up in your `providers.tsx` file. It wraps your application to handle initialization, events, and automatically applies client safeAreaInsets to ensure your app doesn't overlap parent application elements.
```tsx app/providers.tsx
import { MiniKitProvider } from '@coinbase/onchainkit/minikit';
export function Providers(props: { children: ReactNode }) {
return (
{props.children}
);
}
```
The MiniKitProvider also sets up your wagmi and react-query providers automatically, eliminating that initial setup work.
### useMiniKit
The `useMiniKit` hook is implemented in your main page component (`app/page.tsx`). It handles initialization of the frame and provides access to the SDK context.
```tsx app/page.tsx
const { setFrameReady, isFrameReady, context } = useMiniKit();
// The setFrameReady() function is called when your mini-app is ready to be shown
useEffect(() => {
if (!isFrameReady) {
setFrameReady();
}
}, [setFrameReady, isFrameReady]);
```
### Creating the Manifest
The Frame Manifest is required in order for users to save the frame to their account. This means its also required to send notifications to the user. We initially skipped this step when setting up the app. Now that we know our vercel url, we can configure our manifest.
To set up the manifest, run the following in your Terminal
```bash Terminal
npx create-onchain --manifest
```
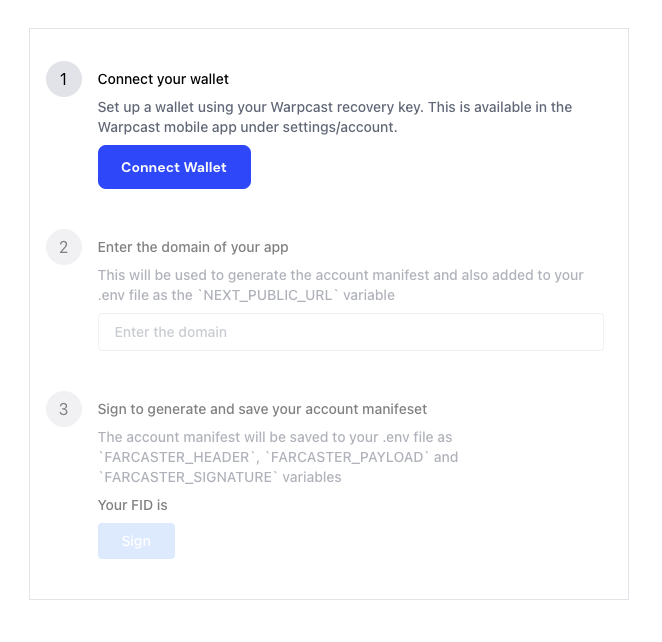
Enter `y` to proceed with the setup and your browser will open to the following page:
The wallet that you connect must be your Farcaster custody wallet. You can
import this wallet to your preferred wallet using the recovery phrase. You can
find your recovery phrase in the Farcaster app under Settings → Advanced →
Farcaster recovery phrase.
Once connected, add the vercel url and sign the manifest. This will automatically update your .env variables locally, but we'll need to update Vercel's .env variables.
Create the following new .env variables in your vercel instance and paste the value you see in your local.env file:
Base64 encoded header from manifest generation
Base64 encoded payload from manifest generation
Signature from manifest generation
Now that the manifest is correctly set up, the Save Frame button in the template app should work. We'll explore that below.
While testing your Mini App please add noIndex:true to your manifest - this is
so the app is not indexed while in developement.
### useAddFrame
The `useAddFrame` hook is used to add your mini app to the user's list of mini apps. It's implemented in your main page component and displays a button in the top right allowing the user to add the mini app to their list.
When a user adds the mini app, it returns a url and token, which is used for sending the user notifications. For this walkthrough we'll simply console.log those results to use them later when setting up notifications.
```tsx app/page.tsx
const addFrame = useAddFrame();
// Usage in a button click handler
const handleAddFrame = async () => {
const result = await addFrame();
if (result) {
console.log('Frame added:', result.url, result.token);
}
};
```
In production, you'll want to save the url and token associated with each user
in a persistent database so that you can send them notifications over time.
### useOpenUrl
The `useOpenUrl` hook is used to open external URLs from within the frame. In the template, its used in the footer button which links to the MiniKit page.
```tsx app/page.tsx
const openUrl = useOpenUrl()
// Usage in a button click handler
// Then in the return function
```
Now that we've reviewed the MiniKit template and the functionality already implemented, lets add some additional MiniKit features.
## Additional MiniKit Features
Now, let's implement additional hooks provided by the MiniKit library. We'll add these features one by one.
### useClose
First, let's add the ability to close the frame from within the interface:
```tsx app/page.tsx
// Add useClose to the import list
import { useMinikit, useAddFrame, useOpenUrl, useClose } from '@coinbase/onchainkit/minikit'
// Add the hook
const close = useClose()
// Add the button in the header right after the `saveFrameButton`
{saveFrameButton}
```
If you reload the frame in the Farcaster dev tools preview, you'll now see the
close button in the top right.
### usePrimaryButton
The Primary Button is a button that always exists at the bottom of the frame. Its good for managing global state which is relevant throughout your mini app.
For the template example, we'll use the Primary Button to Pause and Restart the game. The game state is managed within the `snake.tsx` component, and we can easily add the `usePrimaryButton` hook there since the MiniKit hooks are available throughout the app.
```tsx app/components/snake.tsx
// add an import for usePrimaryButton
import { usePrimaryButton } from '@coinbase/onchainkit/minikit';
// game state already exists, so we'll leverage that below.
usePrimaryButton(
{ text: gameState == GameState.RUNNING ? 'PAUSE GAME' : 'START GAME' },
() => {
setGameState(
gameState == GameState.RUNNING ? GameState.PAUSED : GameState.RUNNING
);
}
);
```
You'll notice that adding the Primary button takes up space at the bottom of the frame, which causes the "BUILT ON BASE WITH MINIKIT" button to move upwards and overlap with the controls.
We can quickly fix that by changing the text to "BUILT WITH MINIKIT" and removing the `ml-4` style in the `className` of the `
### useViewProfile
Now, let's add profile viewing capability. The useViewProfile hook allows you to define what profile to use by defining the user's FID, which is great for social applications. If you don't define an FID, it defaults to the client FID.
```tsx app/page.tsx
import { useViewProfile } from '@coinbase/onchainkit/minikit';
// Add the hook
const viewProfile = useViewProfile();
// Add the handler function
const handleViewProfile = () => {
viewProfile();
};
// Add the button in your UI in the header after the close button
;
```
### useNotification
One of the major benefits of mini apps is that you can send notifications to your users through their social app.
Recall the token and url we saved in the [useAddFrame section](#useaddframe)? We'll use those now to send a user a notification. In this guide, we'll simply send a test notification unrelated to the game activity.
```tsx app/page.tsx
//add useNotification to the import list
import {..., useNotification } from '@coinbase/onchainkit/minikit'
// Add the hook
const sendNotification = useNotification()
// Add the handler function
const handleSendNotification = async () => {
try {
await sendNotification({
title: 'New High Score! 🎉',
body: 'Congratulations on achieving a new high score!'
})
setTimeout(() => setNotificationSent(false), 30000)
} catch (error) {
console.error('Failed to send notification:', error)
}
}
// Add the button in your UI
{context?.client.added && (
)}
```
Notice that we first check if the user has added the frame to their list of
mini apps before displaying the button. This is using the `context` object
provided by `useMiniKit()`. If you don't see the button to send the
notification, its likely because mini app hasn't been saved.
## Conclusion
Congratulations, you've created your first mini app, set up the manifest, added key MiniKit hooks, and sent your users a notification! We're excited to see what you build with MiniKit!
Learn more about MiniKit features and capabilities
Design patterns for social mini apps