

Complex Onchain NFTs
Many NFTs are dependent on offchain metadata and images. Some use immutable storage locations, such as IPFS. Others use traditional web locations, and many of these allow the owner of the contract to modify the URL returned by a contract when a site or user attempts to retrieve the location of the token art and metadata. This power isn’t inherently bad, because we probably want someone to be able to fix the contract if the storage location goes down. However, it does introduce a requirement to trust the contract owner. Although challenging, it is possible to write a smart contract that contains all the necessary logic and data to generate json metadata and SVG images, entirely onchain. It will be expensive to deploy, but will be as cheap as simpler contracts to mint! In this tutorial, we’ll show you how to do this to create your own fully-onchain art project, similar to our sample project.Objectives
By the end of this tutorial you should be able to:- Programmatically generate and return json metadata for ERC-721 tokens
- Deterministically construct unique SVG art in a smart contract
- Generate deterministic, pseudorandom numbers
Prerequisites
ERC-721 Tokens
This tutorial assumes that you are able to write, test, and deploy your own ERC-721 tokens using the Solidity programming language. If you need to learn that first, check out our content in Base Learn or the sections specific to ERC-721 Tokens!Vector Art
You’ll need some familiarity with the SVG art format and a basic level of ability to edit and manipulate vector art. If you don’t have this, find an artist friend and collaborate!Creating the Art Assets
To start, you’ll need to build a few vector art assets and mock up an example of what your NFT might look like. Later, you’ll cut these up and format them in a way that your smart contract will use to assemble unique NFTs for each minter. The mockup needs to have all of the elements you plan to have in the NFT, and you should be able to manually move things around or change colors to make it so that you can create the range of variation you want. For example:- A gradient sky in which the colors are randomized
- One of three styles of sun, always in the same spot in the upper right corner
- One to five clouds placed randomly in the upper half of the canvas
- A wide mountain ridge that will always be in the middle, but slide side to side to show a different part for each NFT
- An ocean in the foreground that is always the same
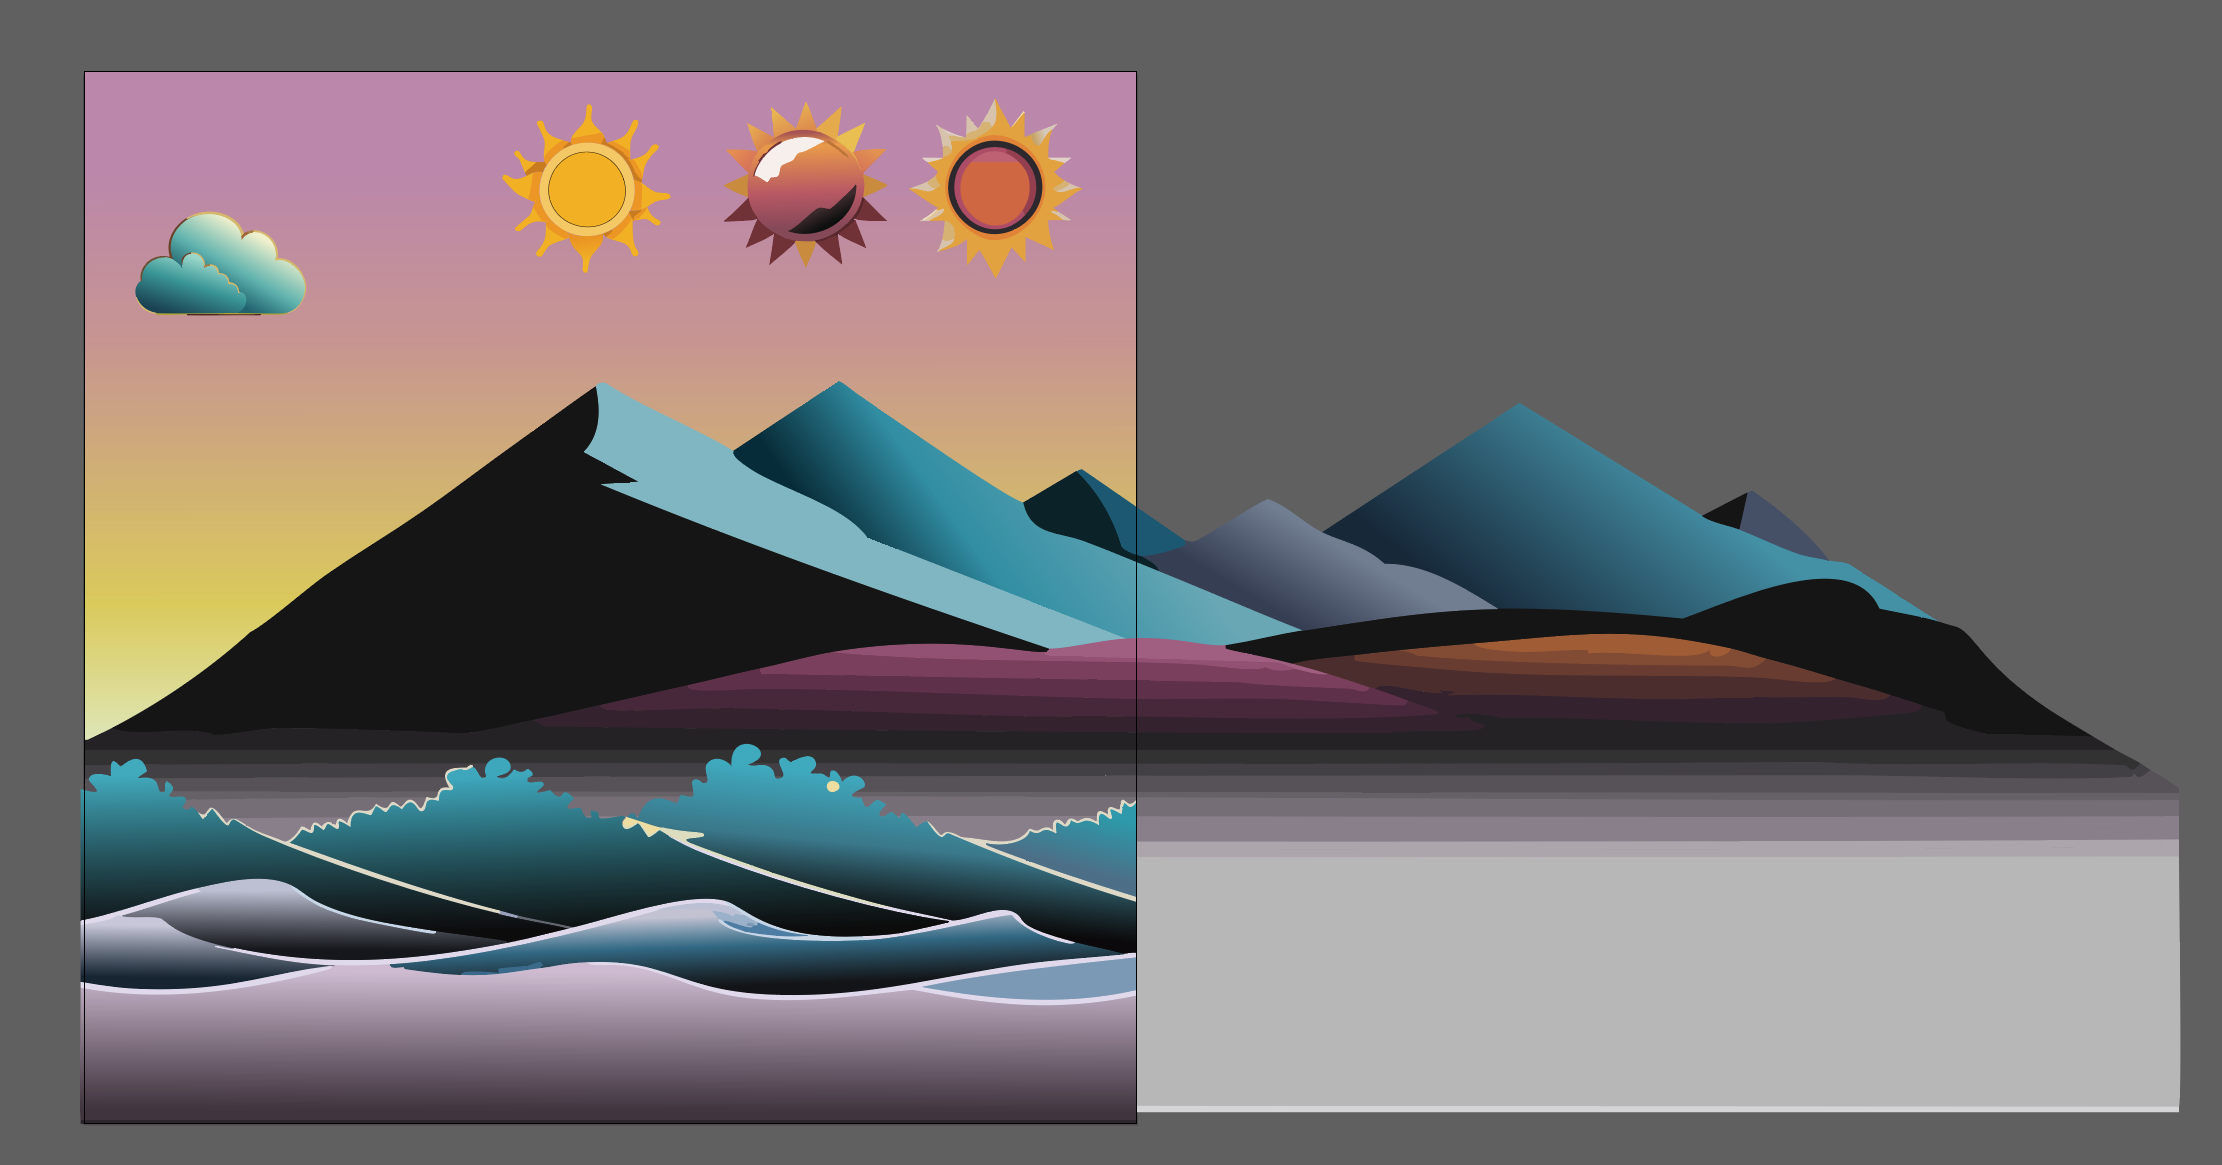
The Art of Making it Fit
You’ll notice that the SVG is probably way too big to be placed in a smart contract. The example is 103 KB, so you’ll have to be clever to make this work. You’ll accomplish this task by splitting each element out of the mockup and deploying them into separate smart contracts. To do so, individually export each element, and make sure that the exported pieces are no bigger than about 15 KB. That way, you’ll have enough space to fit each piece within the 24KiB limit for compiled bytecode. If you’re working with the sample, you’ll end up with individual SVGs for:- Sun 1: 9 KB
- Sun 2: 9 KB
- Sun 3: 9 KB
- Ocean: 17 KB
- Mountain: 14 KB
- Cloud: 6 KB
- Sky: 802 bytes
Contract Architecture
You’ll need to build and deploy a number of contracts for this project. They’ll be organized in this architecture: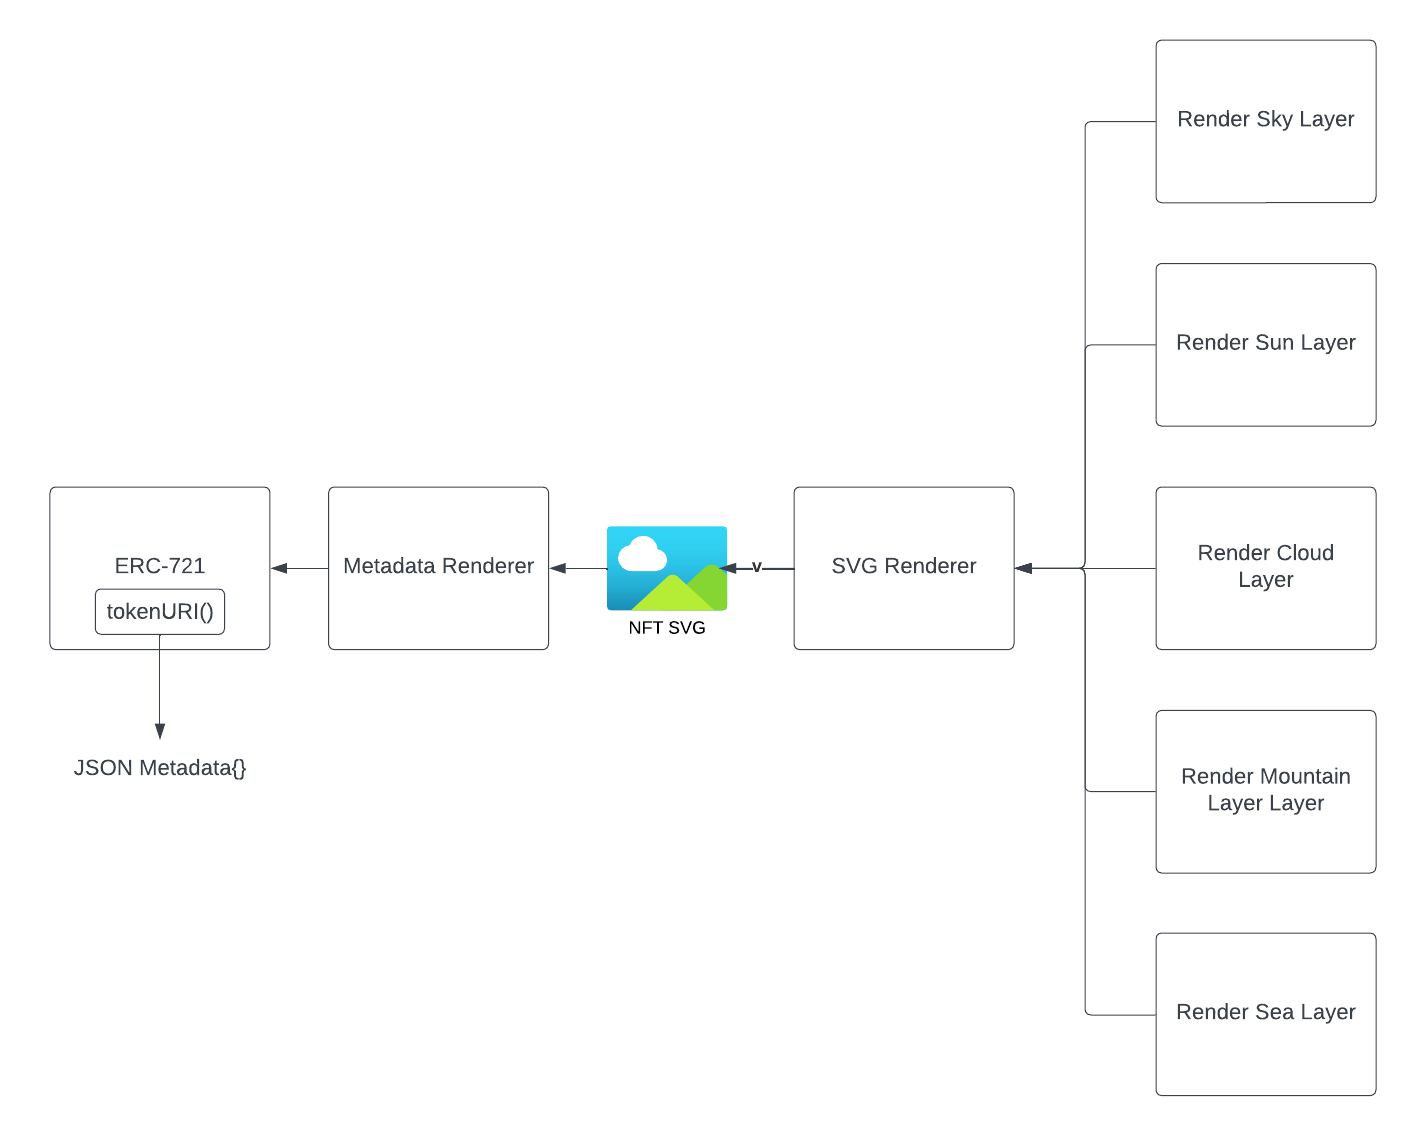 Deploying this many contracts will have a cost associated with it, but once they’re deployed, this contract will cost the same as any other NFT contract. Remember,
 pure and view functions called outside the blockchain don’t cost any gas. This means that you can use multiple contracts to assemble a relatively large graphic without additional costs!
Building the Contracts
Create a new project using the toolkit of your choice, and add a contract calledLandSeaSkyNFT. Import OpenZeppelin’s ERC-721, inherit from it, and set it up with the constructor, a mint function, and a counter to keep track of the token ID:
Overriding the _baseURI() Function
Normally, you’d override _baseURI() with the base URL for the location you select to keep your NFT metadata. This could be a website, IPFS folder, or many other possible locations.
Since this contract will be generating the .json file directly, instead set it to indicate this to the browser:
Importing the Base64 Library
As indicated above, you’ll be returning the json metadata in Base64 format. OpenZeppelin has a utility contract to do this. You’ll also need theStrings library. Go ahead and import them:
Base64 allows the transport of binary data over the web in a reliable way. It is not a compression algorithm, and actually increased the data size by a 4/3 ratio.
Planning the override for the tokenURI() Function
Next, set up your tokenURI function override. You’ll need to write some other contracts to make this work, but you can write most of the code and stub out a plan for the rest to:
- Check and ensure the token ID exists
- Compile the json metadata for the token, including:
- The
"name"of the NFT - A
"description" - The
"image"
- The
- Base64 encode the above, combine it with the
_baseURIand return it.
Test Your Progress
Test your function by writing a simple test to mint an NFT, then call and log the output of thetokenURI function. You should get something similar to:
echo -n '<string to decode>' | base64 --decode
Do so, and you’ll get:
Building the SVG
Next, you need to build logic to compile a real, working SVG from the pieces you’ve saved. You’ll also need to add some variation based on the ID of the NFT.SVG Renderer Contract
Add a new file and contract calledSVGRenderer. It doesn’t need a constructor, but it will need the Strings library:
abi.encodePacked to build everything from the SVG except the actual art. That’s much too big for one contract, so add stubs instead.
Depending on the tool you used to make the SVG, there may be unneeded extras you can remove from these lines. You also don’t need the items in <defs> or <styles>. You’ll take advantage of the flexibility of the format to include those in the pieces returned by the supporting contract.
Rendering the Sea
The sea element of this NFT will be the same for all NFTs, so it makes sense to write that contract first. Create it called,SeaRenderer, with a function called render. The <g> element is the root of the different pieces of the SVG, so add that and a stub for the rest.
viewBox="0 0 1024 1024". Move the <defs> and <scripts> tag inside of the <g> tag. Open the SVG in the browser to make sure it hasn’t broken.
Next, delete the id and data-name from the top level <g> and experiment with the transform="translate(20,2.5)" property to move the art back down to the bottom of the viewport.
With the sample art, <g transform="translate(0,700)"> should work.
The last edits you need to make are critical - do a find/replace to change all of the cls-1 and similar classnames, to cls-land-1! Otherwise, the classes will override one another and nothing will be the right color. Also find all instances of linear-gradient and do the same.
Make sure you change both the definitions, and where they’re called!
Finally, use the tool of your choice to minify only the outermost <g> tag and its contents. This will flatten the code to a single line and remove extra empty character spaces. Doing so makes it easier to add to your contract, and makes the data smaller. Add it as a constant string to SeaRenderer.sol:
TODO with the constant.
<SVG> tags, it renders as expected!
Calling SeaRenderer
Return toSVGRenderer.sol. Add an interface for the SeaRenderer. All of your renderer contracts will have a function called render that either takes a uint _tokenId, or no arguments, and returns a string. Because of this, you can use a single interface for all the render contracts:
SVGRenderer contract for the SeaRenderer, and a constructor that takes an address for the SeaRenderer:
// TODO: Add the sea, with a call to your external function.
Finishing a First Pass
Return to yourLandSeaSkyNFT contract and add an interface for the SVGRenderer.
constructor to set it:
For testing purposes, it may be easier if you add functions to allow you to change these addresses after deployment. But the whole point of all this work is to make immutable, onchain NFTs, so be sure to delete them before you do your real deployment!
TODO with a line to Base64.encode a call to the renderer:
Test Deploy
Now is a good time to deploy to testnet and see if this first pass is working as expected. If you’re using Hardhat and Hardhat Deploy, you can use this script:LandSeaSkyNFT (the above script will do this).
Open the contract in Basescan, connect with your wallet, and mint some NFTs.
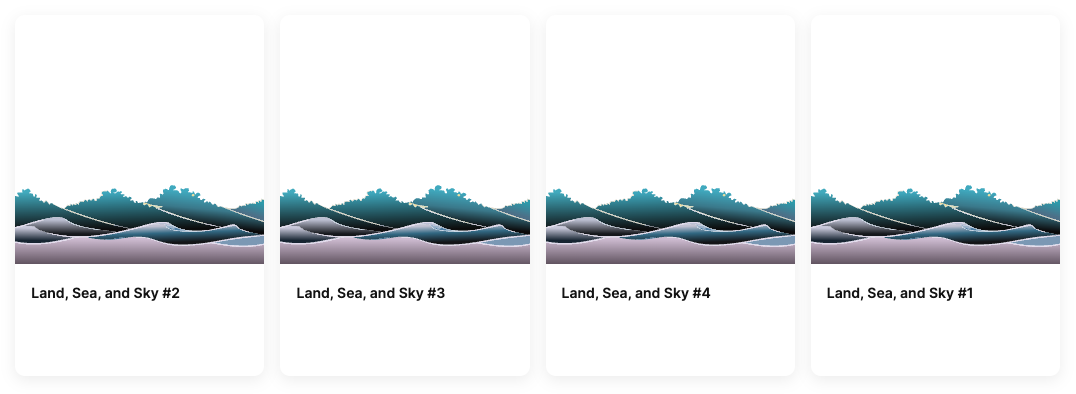
Wait a few minutes, then open the testnet version of Opensea and look up your contract. It may take several minutes to show up, but when it does, if everything is working you’ll see NFTs with the ocean part of the art! Neat!
Adding the Sky Renderer
Great work! Much of the hardest part is done. All you need to do now is add a renderer for each of the other elements, with the twist that you’ll be doing customization inside the SVGs themselves. You’ll have to do a little surgery!Preparing the SVG
Open the sky SVG in both an editor, and the browser. As with for the sea, the first step is to change the viewport to 1024x1024, move the<defs> and <style> elements inside the top-level <g>, and transform/translate that group to the correct location (0,0 will work!).
Change cls-1 to cls-sky-1 in both the definition and where it’s used. Add sky to the linear-gradient as well.
Delete the data and layer information for this group as well. You’ll end up with:
<g> group and contents, then create two constant strings, one for everything before the first <stop> element, and one for everything after the last <stop> element.
Neither string should have the <stop>s. You’ll make those next.
Building the Renderer Contract
Add a new file and contract calledSkyRenderer. Add your strings:
offset and stop-color properties:
render function. It will use the built in method of using abi.encode and casting to string to combine all the parts and return them.
buildStop:
_tokenId. It needs to be “random” in the sense that every NFT should be different, but it has to be deterministic, so that you get the same art every time you load the image.
First, subtract 10 from the values and convert them to uints without decimals in each of your stop constants, and reduce the last to 80:
_buildStop.
Add a function to _buildOffsetValue. This will pick an integer between 0 and 20 for each offset, and add it to the modified offsets you just made. The result will be a change of + or 1 10 for each value (with the last being slightly different to keep it in range):
".12+.20" == ".32".
Finally, update your render function to call _buildStop:
Incorporating the Sky Renderer
Return toSVGRenderer.sol and add an instance of ISVGPartRenderer for the skyRenderer. Add an argument to the constructor and initialize it, then call the render function in place of your TODO for the background.
Adding the LandRenderer
Next up is the mountain part of the SVG. For this, you’ll change the horizontal translation left to right to show a different part of the mountains for each NFT.Preparing the SVG
Open the mountain SVG in both your browser and the editor. Once again, set theviewBox to 1024x1024 and move the <defs> and <styles> inside the top-level group (<g>).
Find transform/translate values that first put the mountains so that they are at the bottom, and the left-most portion is shown, then the right-most. transform="translate(-150,350)" and transform="translate(-800,350)" are about right.
Don’t forget to add -land to the classnames!
Writing the Contract
Add a file and stub for theLandRenderer:
<g> element, and add a constant with everything after the opening <g> tag. Use similar techniques as before to generate an offset based on the token id, then build the SVG. You’ll end up with something like this:
Incorporating the LandRenderer
UpdateSVGRenderer:
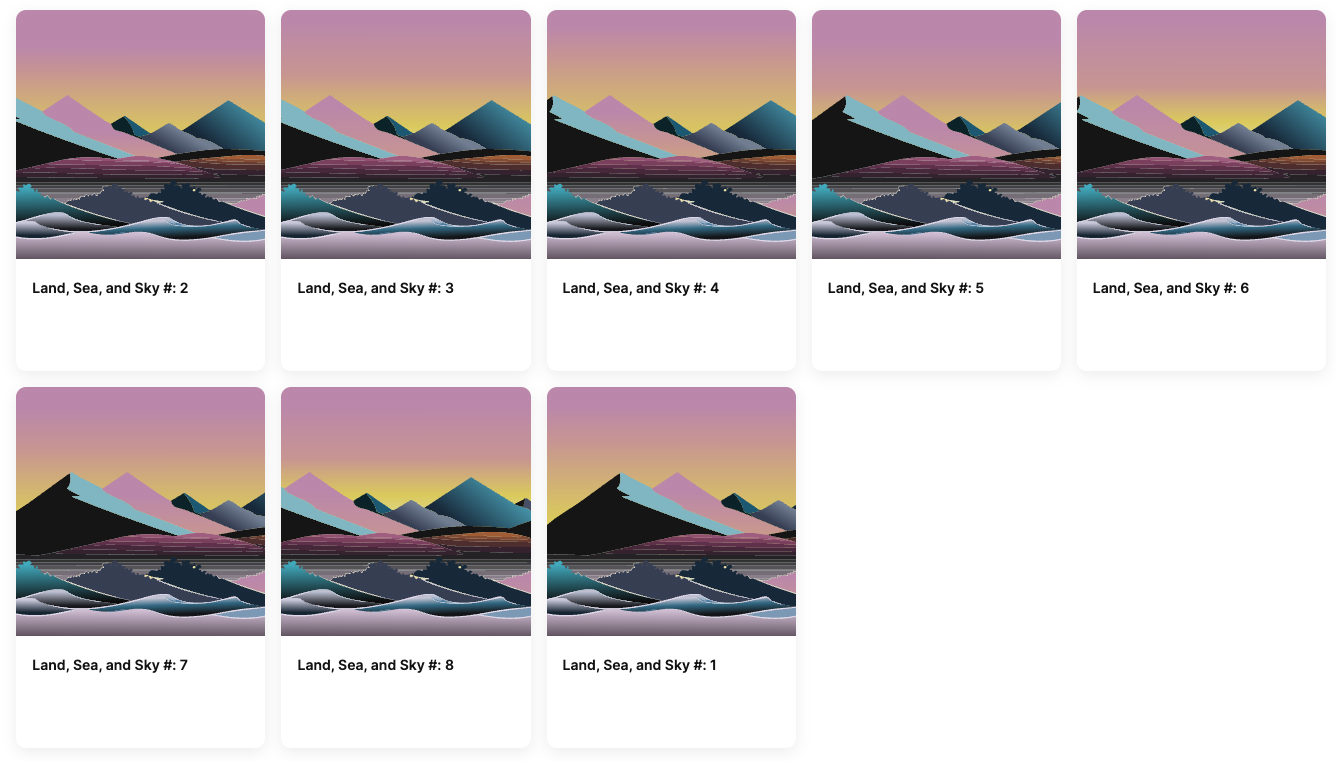
Adding the Sun Renderer
The sun renderer will use similar techniques as those you’ve already incorporated. The sun will be in the same place for all NFTs. Variation will come from each one having only one of the three suns shown in the exemplar art file.Preparing the SVGs
For each of the three sun SVGs:- Change the
viewBoxto 1024x1024 - Move the
<defs>and<styles>into the first group - Find the correct translation to put the sun in the upper right
- 750, 100 should work with the sample art
- Add
-sunto the classnames
Writing the Contracts
The tricky part here is that you can’t fit all the suns into one contract. They’re too big! Instead, split them into three, similar to the original ocean renderer. For example:Incorporating the SunRenderer
Add the threeSunRenderers as you have the other rendering contracts. You’ll have to incorporate this one a little differently. Add a function that picks which SunRenderer to call, based on the NFT id.
skyRenderer in the main render function!
Adding the Cloud Renderer
On your own, try adding the clouds. The clouds renderer should:- Randomly select between one and seven clouds
- Place those clouds randomly on the top half of the canvas
- Be on the layer on top of the sun and sky, but below the sea and mountains